


I publish these free articles and tutorials because of my DaVinci Resolve Editing and Grading Workshops, coming up in September and October: Online (Zoom), in English, and for a small group of maximum 8 students.
If you are interested in learning Resolve with a very experienced teacher like me, get informed here for my Editing Workshop and here for my Grading Workshop. Reviews from y students can be found here.
Now, with the free article of today!
The 10 things i love about editing with davinci resolve
In this article I want to focus on the editing tools in DaVinci Resolve, and show you 10 ideas, tools and features to make your editing fly!
Obviously, some of these things are also present in other programs (Avid Media Composer, Premiere Pro, Final Cut Pro X).
Some of them! Not all of them!
That said, the implementation and design in Resolve really shines.
1. Logging and organising footage. Metadata.
DaVinci Resolve is dream come true when it comes to logging and organising rushes.
There are many ways to do this, but I specially like the Metadata window, found in the Media, Edit, Fusion and Fairlight tabs.
Here it is:
![Image [5]](https://creativefilmediting.wordpress.com/wp-content/uploads/2018/08/image-5.png?w=700)
But also, it offers those fields you see in the image, to add information to the clips: Description, Comments, Color, Scene, Take, Angle, Shot Type, Date Recorded, Camera, and a lot more.
And another thing I like a lot: we can use keywords to identify any element of interest in a clip: character names, themes, movements… Anything we need to highlight, so we can locate and group based on those words, short of what Final Cut Pro X can do.
And here’s where it gets really interesting: DaVinci Resolve offers Smart Bins.
Smart Bins can be used to group automatically clips based on one or more search criteria.
We could, for example, use a Smart Bin to group: all clips shot with a GH5, at night, handheld, good take, and this or that character…
It’s a really useful, powerful thing to do, and it shines in big fiction and documentary projects.
2. Familiar editing inter-face.
If you already edit with Premiere Pro, Avid Media Composer, Final Cut Pro 7, or even Final Cut Pro X, the transition to edit in DaVinci Resolve is really very simple.
The inter-face found in the Edit tab in Resolve is a familiar inter-face, and we can work with it easily:
![Image [6].png](https://creativefilmediting.wordpress.com/wp-content/uploads/2018/08/image-6.png?w=700)
Old good inter-face! And it makes sense!
Now, for example, if you are coming from Final Cut Pro X, and prefer to work with just one viewer, acting as source or edit depending on where you click, Resolve also allows this.
3. Show Zoomed Audio Waveforms.
This option is kind of hidden, and is also quite simple, but I just love it and use it every time: Show Zoomed Audio Waveforms.
We can activate this in our source viewer menu.
It displays, name says it all, a zoomed audio waveform as an overlay on the video, so we can see both video and waveform information at the same time.
The zoomed waveform of course scrolls as we play around.
Trust me. Activate and use this. It helps a lot.
![Image [15].png](https://creativefilmediting.wordpress.com/wp-content/uploads/2018/08/image-15.png?w=700)
4. Timeline customisation.
DaVinci Resolve offers many options to display clips and tracks in the Timeline: show or not show waveforms, change all video or audio tracks height, re-name tracks…
But here’s my favourite: Resolve allows to assign per track colors, so every time we edit a clip to color-code tracks, the clip acquires that defined track color.
![Image [8]](https://creativefilmediting.wordpress.com/wp-content/uploads/2018/08/image-8.png?w=700)
These colors are not assigned to the clips individually. The tracks have a color assigned.
This is still very very flexible, because, if you change the Clip Color to any individual clip in a color-coded track (using, for example, the Metadata window), the clip will acquire that new color.
So Clip Color has priority. Second: track color.
Track colors help me a lot, specially in the case of sound. I always use different colors based on the content: music, fx, narration, etc..
5. Edit Index.
Originally seen in Final Cut Pro X, DaVinci Resolve 15 now has an Edit Index.
It displays a list with all content in a Timeline:
![Image [16]](https://creativefilmediting.wordpress.com/wp-content/uploads/2018/08/image-16.png?w=700)
Also, the Edit Index menu allows to select the elements to display: just video, just audio, just markers, etc..
Really useful and smart.
6. Multiple Timeline Display.
Possible in the old Final Cut Pro and Premiere Pro, Resolve brings the best implementation of the idea: Stacked Timelines.
Once activated in the Timeline View Options, we can display multiple timelines in different tabs, or even better, one of top of the other one, like you can see here:
![Image [10]](https://creativefilmediting.wordpress.com/wp-content/uploads/2018/08/image-10.png?w=700)
7. Deflicker.
It probably happened to you already.
And if not, it will happen.
Light waves that fluctuate in the image, specially when fluorescent lights are around.
There are some ways to prevent this in some cameras, but it’s a very common problem.
DaVinci Resolve Studio (the paid version) comes with a Deflicker effect that solves the issue almost automatically.
We added to the clip in the Timeline, select the mode Fluoro Light, and ready to go!
And the good news: it works really well.
Sure, this is not available in the free version of Resolve, but, when you consider some deflicker plugins for Premiere Pro or After Effects cost around 240 Euros, buying DaVinci Resolve Studio for just 300 Euros makes a lot of sense.
![Image [9]](https://creativefilmediting.wordpress.com/wp-content/uploads/2018/08/image-9.png?w=700)
8. Compound Clips that you can “undo”.
If you are not familiar with Compound Clips, check them out, and introduce them in your workflows.
They are invaluable.
You can use Compound Clips to group together a number of clips in your Timeline, resulting in a new single Compound Clip, that you can use, for example, to animate it, compose it or apply an effect to the whole unit.
You can also use them just to simplify your Timeline. For example, you could Compound Clip all of the elements of particular scene or sequence in your story. That way, it’s a lot easier to move it around, or just look a it.
In any case, you can always “enter” the Compound Clip, and access/modify the elements inside.
Compound Clips also exist in Final Cut Pro X, and Premiere Pro, where we call them Nested Clips.
But: can you “undo” a Compound Clip? Meaning: can you restore the elements you grouped in the first place in get rid off the Compound Clip?
In DaVinci Resolve, this is possible.
You just right-click on the Compound Clip and click on Decompose in place. This restores every clip, and of course you loose whatever effects work you did on the Compound Clip.
This is how it goes:
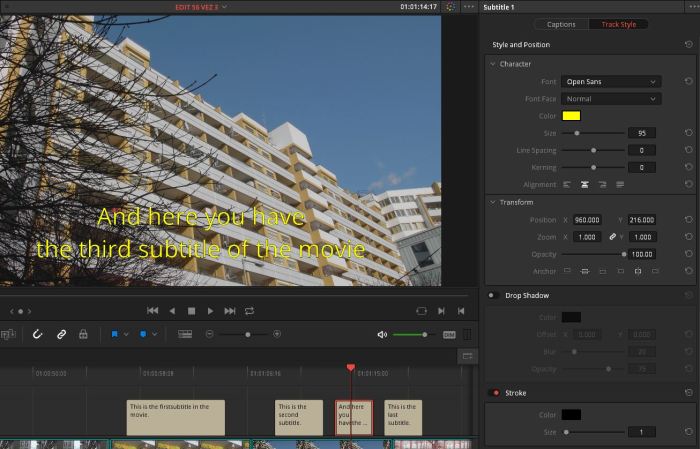
9. Integrated subtitles.
No matter what kind of project you edit, today subtitles are a must: film projects, internet video… Everybody needs this.
To my taste, DaVinci Resolve has the best solution to work with subtitles.
In Resolve we can:
- Generate one or more subtitle tracks, and make changes in the style of every subtitle in a track simultaneously.
- Export subtitles as .srt files.
- Export subtitles as embeded captions.
- Burn subtitles on export.
- Import an external subtitle file and generate a subtitle track from it.
You may check my subtitles tutorial here.
10.Easy to understand Media Management.
You know what this is, right?
With Media Management we refer to all operations involving copying, moving, or transcodind media in a project.
All editing platforms have Media Management functionality, and probably Avid Media Composer is still the best and most sophisticated at this. But: usually, this kind of operations, apart from being a little bit unknown by most users, are also complicated, the way they are designed.
Well… DaVinci Resolve has Media Management tool that is actually very sophisticated, well designed, and super easy to understand and use.
The tool, found under the File menu, nearly explains itself:
![Image [7]](https://creativefilmediting.wordpress.com/wp-content/uploads/2018/08/image-7.png?w=700)
First, we decide if we want to act based on the media of the Entire Project, the Timelines we select, or the Clips we select.
Then, we choose the desired operation to perform with that media: Copy, Move, or Transcode. All of them offer different options.
Again: this is very straightforward and practical.
If you are interested in my upcoming Live Online DaVinci Resolve Workshops, click here to find out about upcoming dates and details.
")


